Masks and Moldmaking

After making a few masks by applying the papier mache directly onto the sculpt (see previous post) I decided I wanted a way to produce multiple copies of the same design.  This’d make it less labour-intensive, quicker, and would save me worrying about ruining hours of work on a mask by getting the decoration wrong.  So, back to the research.  In Venice, they seemed to create a clay sculpt of their design, then cast it in plaster to create a mold for the papier mache.

Plaster of Paris seems to set in most circumstances (even underwater) so I skipped the clingfilm and poured it straight over a new plasticine sculpt.  My suspicions proved correct, and it set with no problems.  I can only assume it was the glue component of the papier mache that didn’t like the plasticine in my last post.

Plasticine mask moldmaking   Plasticine mask moldmaking

The plasticine then peeled out of the mold easily, leaving a smooth surface for the mache.

Plasticine moldmaking mask

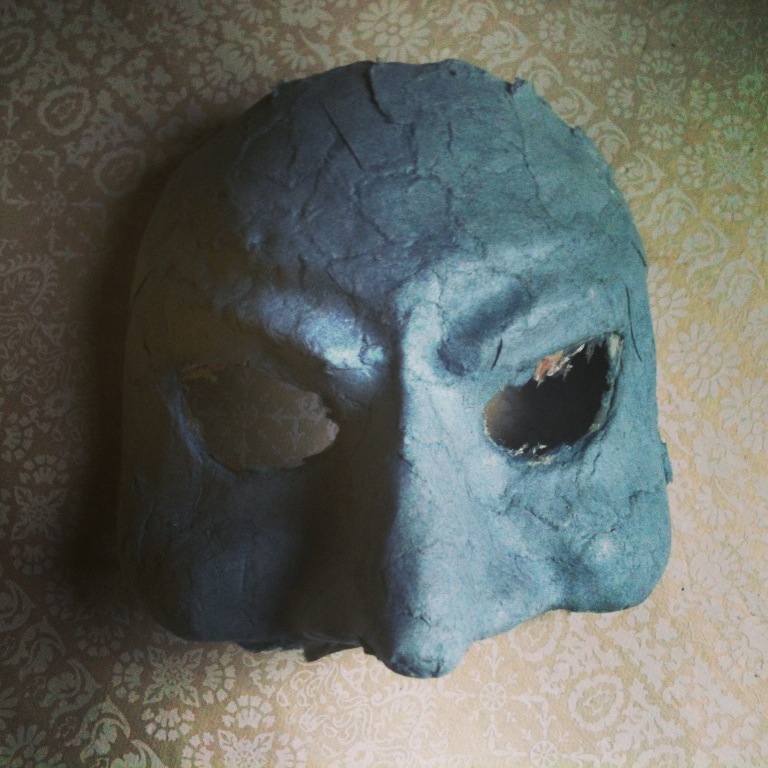
And there we go!  A replicable design.  The loose bits of mache need sticking down, the edge trimming, and a smooth layer added on top, but it still takes a fraction of the time the other method did.  Still- I’ll use the method from the last post if I want to make a one-off mask, or a more complex design.  The more complex the surfaces, the harder it’ll be to get it out of the mold.

Plasticine mask moldmaking

Red and Gold Mask

Here I experimented with a method for raised gold detailing using replica gold leaf.  Think I need some practice.  I also tried adding a wash of dark paint and then removing most of it to give an aged appearance and visually deepen the recesses.  Again, not satisfactory and will need a good bit of experimentation before I try it on a mask I like!

Gold Detailing Mask   Gold Detailing Mask

Here I used the same technique to create the raised lines, but instead of using gold leaf, I picked them out with gold acrylic paint above by just covering the whole area in gold paint, and below by trying to stick to the raised areas, and distressing the rest with another wash of dark paint.  I think it makes it look like it’s just been dug up, rather than carefully stored and aged for half a century, but there we go.

V Mask

All of this was to try and make a mask for a friend, and here’s what I produced by the end of that period of experimenting.  My first finished mask: gold leaf raised detailing on blue and gold.

Let the Maskmaking Begin…

I’ve always loved masks: from recurring obsessions with Phantom of the Opera and Labyrinth, to finding every project for my anthropology degree tended towards masquerade and transformation.  I’ve also had a good few attempts at making them throughout my life, but it’s been a while since I attempted it with any real focus on refining technique.  My early masks were thick, unweildy, lumpy papier-mache creations, better suited for hanging on the wall than wearing.

Earlier this year I went on a short holiday to Venice with friends.  As a mask obsessive, it’s somewhere I’ve always wanted to visit, and I was not disappointed!  I’m afraid I dragged my friends into every second mask shop that we saw (and there’s certainly no lack of them), turning the masks over and trying to work out how they were made, as well as admiring the amazingly skilled decoration.  Needless to say, I came back inspired and fired with determination to give mask making another shot.  I researched, bought a couple of books, and experimented for a few months.

For my first attempt I used a method suggested by Jonni Good in her book ‘How to Make Masks’, which is well worth buying if you’re interested in starting to make masks.  It uses easily obtainable materials, and results in a lightweight, smooth mask.  Jonni also runs an excellent website over at Ultimate Paper Mache filled with great tips, videos and examples of her work which helped no end.

For my very first attempt I used an old clay model of my face (I’m sure everyone has one of these lying around) and created a sculpt from plasticine on top.  I then built the papier mache directly onto the finished model:

Plasticine Mask Sculpt    Plasticine Mask Mache

Plasticine is horrible to work with, I’ll say that straight away.  Smelly, stubborn, and leaves a nasty residue on your hands.  I also discovered that it reacts badly with the plaster/glue papier mache mix and retards the drying process.  After half a week it was still gloopy, so I abandoned this mask and started afresh.

Plasticine Devil Sculpt Plasticine Devil Mache

I decided to go for a full face mask, again using plasticine on top of the clay model.  This time I covered the model in clingfilm (using vaseline to get it to adhere to the model and follow all the recesses and details), and then added the mache.  This worked an awful lot better, and the mask was almost dry in an hour.

Plasticine Devil Mask

Here’s the devil mask trimmed and after a bit of sanding.  It fits my face so well it hardly needs a cord to stay on!  There’s still a bit of smoothing to do before I paint him.  The disadvantage of this method is that once the mache is dry, you’re pretty much guaranteed to destroy the original sculpt as you pull it out of the back of the mask.  That makes this chap a one-off, so I’m a little nervous about painting him in case it goes wrong.  I decided to make a few more masks to experiment on before painting this one, and to do that I wanted a method that would let me create multiples of a particular design…


Baking Bad

I couldn’t let Breaking Bad finish without some kind of celebration.  It has, after all, been one hell of a ride these last few years, and I have no idea what I’m going to do with my Monday nights now it’s all over.

Stage one: the cake.

baking bad cake

It’s a blue (well, more aquamarine to be honest, damn you Todd!) and white marbled two layer cake.  This layer did a bit of a chestburster inpression as I tried to bash coax it gently out of the tin, but as you can see the cracks where it was reattached are barely noticable.  Or at least, it’ll all be covered in piles of icing soon, so frankly who cares.

Baking Bad Crystal Cake

And here it is, possibly the most dangerous Breaking Bad cake in East Anglia.  The ‘crystal meth’ is rock candy (see previous post) and while not as dangerous as the first lot I made I’d still recommend removing the big shards before taking a bite!

Breaking Bad Cupcakes

The second batch of cake mix I made into cupcakes for my fellow BrBa obsessed colleagues. I made about 15 and they disappeared pretty quickly, so I’m glad I kept a few aside for the actual episode later that night!

Dangerous Cakes

I had a little of the candy glass left over, so… dangerous cake happened.  This one was later carefully deconstructed and eaten by trained professionals.

Breaking Bad ChocolatesBreaking Bad Chocolates

By the time I’d finished baking, I was on a bit of a sugar high so of course Breaking Bad Chocolates seemed like a brilliant idea, never mind that I already had half a kitchen’s worth of washing up to do.

Dark chocolate with blue-tinted white chocolate filling and candyfloss-flavoured crystals.  Nom.

Monday evening finally came around and before viewing commenced we ate (no rumbling stomachs would dare interrupt this episode!): the boy had cooked us Pollos Hermanos chicken in a basket, complete with Cap’n Cook’s Special Ingredient fries.  An awesome surprise to make the night complete!

Los Pollos Hermanos

Breaking Bad Rock Candy

With the finale just around the corner I decided it was about time to try making THIS blue meth inspired Breaking Bad Cake. The gloriously blue sparkle on top is blue rock candy and while I’m sure I could probably have ordered some online, I figured trying to make my own was a little more in the spirit of the show.  Candy making takes some exact measuring and temperature control after all!

I used this recipe by SugarHero though for my first attempt I tried using a dodgy thermometer which, predictably, didn’t work out and I ended up with a sheet of goo that slowly crystalised over a period of 3 days…

P1030348

Sufficed to say I obtained a proper candy thermometer for the next batch.  And now I’ve got it I’ll obviously have to make it worth buying by making vast amounts of candy.  That, and it’s great fun!

P1030342

As the initial batch had clearly not reached a high enough temperature to set, I overcompensated with this lot resulting in a slightly greenish tinge from caramelisation (I really should have just renamed it “Todd’s Slightly Dubious Aquamarine Meth” instead) and a very rapidly hardening batch of candy.  The dregs did a pretty good impression of candyfloss as I tried to pour it out into the waiting tray:

Meth candy

Still, I ended up with a lovely glassy sheet of Breaking Bad inspired candy which solidified within a couple of minutes.  Then came the fun part- smashing it!

P1030350

It really does look like broken glass…  And it’s sharp enough to do a good impression by touch as well, most likely because I cooked it to a higher temperature than was needed rendering it more like hard boiled sweets than a softer cracked candy. This probably makes it a pretty dangerous cake topping so I’ll use this batch to accessorise my Heisenberg Candy labels (designed last week), and have another go at the weekend.

P1030353

And the final result, smashed, bagged, and tagged: Heisenberg’s Blue Sky Crystal Candy.  That distracted me for a bit, now back to waiting for the final episode…

Heisenberg's Blue Sky Candy

Heisenberg's Blue Sky Candy

Venice

I visited Italy for the first time this April on a long weekend with friends in Venice.  Some subconscious part of my brain had expected the stunning architecture and beautiful views to extend only as far as could be seen from the Grand Canal; the rest of Venice dilapidated or modern-built, hidden behind a preserved façade for the benefit of tourists.  However, I was hard pushed to find even a single alleyway or building that looked out of place, even on the less commercial side of the island.  Tiny canals criss-crossed with walkways and bridges; sun-dappled courtyards hidden in a labyrinth of passageways, all barely wide enough for two people to walk abreast; trees growing from rooftops; and alleyway walls adorned with unexpected statues and paintings.

Venice
P1010757
Canals of Venice

Even the graffiti was fascinating…

Plague Doctor Pigeon Graffiti in Venice

And of course, there were the masks.  Most shops were happy for us to take photographs, so we took full advantage to snap away.  I ended up buying a colourful horned mask to take home (how could I not?) which caused confusion at the airport x-ray machine where I was taken aside and asked to unpack the bag to reveal what was inside the many layers of packaging.  I’d like to think they were startled to see a devil grinning his way through the machine, but it’s more likely to have been the metallic outer bag of the coffee I was taking home!

Masks of Ca' Macana
One of the many beautiful masks of Ca’ Macana

I’ve experimented a little with pseudo-venetian masks in the past, but this trip has re-fired my determination to master the techniques.  Many of the masks shops also run workshops, and I’d absolutely love to return there someday for an in-depth training session.  In the meantime I’ll carry on pottering around with moulds and plasters and see where I get to on my own.

Baking

I had a day off and a birthday to bake for, so I treated myself to a copy of the Clandestine Cake Club Cookbook.  I love the idea behind the book: groups of strangers would meet in secret locations across the UK to bake on a theme, eat, and talk about cake.  The website is well worth a look: clandestinecakeclub.co.uk though unfortunately there don’t seem to be any in my part of East Anglia.

The book is rather lovely too.  I was initially attracted by the fact that the recipes didn’t look too complicated or require huge amounts of ingredients, and yet the resulting cakes all looked delicious.  I’m a sucker for cookery books with gorgeous photos.  In fact, I would have had great trouble choosing which recipe to try if the recipient hadn’t been someone who dislikes chocolate!  I decided to go for the Dorset Apple Cake:

Dorset Apple Cake

It was delicious (especially still just warm, with a dollop of cream) and went down a treat!  My cake tin wasn’t quite the right size, so I opted to make a mini version to use up the excess and perform the very important task of test cake.  I totally had to eat most of it before deciding that it had definitely passed.  You can’t be too careful…

As well as wanting to make every single cake in the Clandestine Cake Club Book, I discovered another good reason to bake more often.  Our house is cold enough that the butter was tough (and I wasn’t organised enough to get up early to leave it in a warm place), so my arms were pretty tired by the time the mix resembled anything like ‘light and fluffy’.  A workout that results in cake?  Don’t mind if I do.

The Cooking Workout

(also for the Design Every Day Project, which I’m just about keeping up with…)

Hares in the Snow

It’s snowing again!  AGAIN!  I thought we were headed for spring now.  Oh well, here’s a quick hare doodle:

haresnow

Also announcing The Design Every Day Project!

I wanted some kind of project that was like-a-new-year’s-resolution-but-not-quite.  Originally I wanted to set myself the challenge of taking a photo every day for a year in order to improve my photography skills.  Just a few days into the new year problems began to emerge with that plan.  I leave for work before the sun rises, and get home after it has got dark, and am generally busy in my lunchbreaks.  Although it would be possible to carry on with the project, the lack of natural lighting on a day to day basis was a huge restriction to start out with.  So, instead, I decided to focus on something more flexible and achievable: A Design a Day.

This will include both my general design work for Cafepress, Zazzle, drawings and the like, but also more experimental work such as book cover design.  Most of the cover designs will be for fictional books.  Hang on… that’s not the most helpful word in a bookish context. Let’s try ‘book titles that I’ve made up and don’t really exist’ instead.  That said, if I see a challenge to design a book cover that takes my fancy, I’ll give it a go and post a link to the challenge.  Equally I’m happy to hear from people who have ideas or would like a cover designed (though I won’t promise anything, having never really tried fulfilling commissions before!)   The aim of the project is to create more often, rather than doing nothing for two months and then going mad for a couple of days.

I don’t get on the computer every day, so there won’t always be a punctual upload (an hour or so an evening really isn’t much time to get a detailed design done in) but I’ll try and keep pace.  The designs will appear on Tumblr and Pinterest.

Geeky Valentine’s Cards

With Valentine’s Day fast approaching I realised that over the years I’ve designed quite a few geeky Valentine’s cards and should probably put them all together in one place, and Pinterest seems like as good a place as any!  Visit the Geeky Valentine’s Day Cards Pinterest Board or click below:

Geeky Valentine's Day Cards

 Follow Me on Pinterest

Whether Pinterest has potential to act as a larger portfolio I have yet to decide.  The trouble is that my designs are hosted across the interwebs at Zazzle, Cafepress, Redbubble and others, so I don’t have any one place to showcase all of them.  It’s a bit too labour-intensive to add every new design to a WordPress page, so I’m on the lookout for a good solution.  Ideas welcome!

Cthulhu Chocolates

This winter I finally got around to a project I’ve been meaning to try for years: Cthulhu chocolates.  The idea came about when a colleague lent me a collection of Lovecraft stories and, during the year+ that it took me to get through it (I was very easily distracted) I started doodling tentacles, monsters, scenes from the tales, and eventually sculpting little Cthulhus, inspired by the description of the figurine found in ‘Call of Cthulhu’.

I have a habit of cycling rapidly through different crafts and projects, so at some point during the reading I started making chocolates.  I’d picked up a cheap mould, expensive chocolate, and spend a few evenings making ganache and filling chocolates with whatever I could get my hands on (see my post on the first batch).

It only took a small mental leap (and the discovery of food-safe silicone putty) to realise I could turn my Cthulhu sculptures into eldritch edibles.  This is the result:

P1010241

And packaged up with some Elder Sign extras to inflict upon colleagues for Christmas (forgive the cuteness, I threw the packaging together in 20 minutes one morning and used an old Cthulmas doodle):

Cthulhu Chocolates

I also made a larger mould, but he had trouble with air bubbles:

Cthulhu Chocolates

The putty was fun to use and definitely has potential…  I don’t tend to make chocolates very often as once I’ve tested them and ‘cleaned’ the melting bowls I really don’t feel like eating chocolate for weeks!